Active Directory

Setting up Active Directory is not difficult. However, many people experience problems with their installation shortly after completing it because they neglect to properly plan their implementation of DNS. I receive e-mail on almost a weekly basis from users who have gone ahead and run dcpromo, and then wonder why client systems can't properly connect to the Internet. The purpose of this article is to act as a quick primer toward ensuring that Active Directory works, while at the same time allowing your network systems proper Internet access.
Before I begin, it's worth mentioning that this article is aimed at users who are looking to install and work with Active Directory on a small or home network. It is not aimed at users upgrading from NT 4 or those planning a major Active Directory deployment including Exchange 2000, although the central concepts outlined still hold true. However, if you are looking for a quick and easy guide to setting up an AD test network, then this article should help to ensure that you get started on the right foot. I assume that the server we are configuring will be the first domain controller in your new Active Directory domain, and that your internal systems can already access the Internet via some method, such as Internet Connection Sharing, NAT, or perhaps some type of connection-sharing hardware router.
The first and most important step in installing Windows 2000 Active Directory is properly planning your DNS implementation. AD cannot exist without DNS, so this is well worth paying attention to. Unfortunately, in their quest for simplicity, Microsoft decided that DNS would be installed automatically as part of the Active Directory installation process if you didn't explicitly configure it in advance. As such, my suggestion is that you always configure DNS manually prior to even considering Active Directory. If you don't, you will probably end up with a DNS implementation that doesn't meet your needs.
At this point, I am going to assume that you have Windows 2000 Server installed. The first step towards a proper AD implementation will involve installing and configuring DNS. If you haven't done so already, add the DNS service to your server from the Windows Components option in Add/Remove Programs in Control Panel, as shown below.
 |
| Active Directory Networking Services |
After adding DNS, the next step is configuring a new DNS zone. The name of the zone is important, and I generally suggest using a "private" name for Active Directory, such as company.local instead of a public name that your company may have already registered, such as company.com. This will help to ensure that both your internal and external hostnames resolve correctly once all is said and done. In this case, create a new zone called company.local using the DNS administrative tool. This is accomplished by right clicking on Forward Lookup Zones and choosing New Zone.
 | ||
| Creating a New Zone The wizard that walks you through the process is fairly straightforward, but be sure to choose to create a standard primary lookup zone, as shown below.
Once the zone has been created, the next step is to ensure that your server is pointing at itself for DNS name resolution. Go into the server's TCP/IP properties and add the IP address of this server as the DNS server address. This step is critical, so be sure not to skip it.  Once this step has been completed, you are ready to begin the Active Directory installation process by running dcpromo from the Run command, as shown below. The Active Directory installation wizard is another simple tool. Our goal is to create a new Active Directory domain, in a new tree, in a new forest - this is ultimately covered in the first 3 input screens of the dcpromo process. The first input screen is shown below.  When prompted for your Active Directory domain name, choose exactly the same name as the DNS zone that you set up earlier — for example, company.local. There is nothing wrong with using a private DNS zone name internally on your network. In fact, many companies prefer it, because it allows them to separate internal and external naming. Most small companies use the services of a hosting provider to handle their email, web, and DNS services. If you did choose to use your public DNS name internally, you would then need to manually create additional DNS records for all of your external clients on your internal servers, or internal clients would not be able to reach your public servers properly. Using a private name internally makes life a great deal easier; the internal DNS server will resolve names for internal servers, while external DNS (like that hosted by your ISP) will still properly resolve the names of external resources. The main reason for setting up DNS in advance is to avoid a very common problem. Many people complain that their DNS server will not resolve names for Internet hosts on account of the Root Hints file not being present, as well as the fact that they cannot configure Forwarders. What this means is that your DNS server has been configured as a Root Server during the Active Directory installation process. In other words, your DNS server thinks that it is the top of the DNS hierarchy, and as such, there is no higher level to which queries should be forwarded. If your DNS implementation is lacking a Root Hints file or the ability to set up Forwarders, see this Microsoft KB article: Once Active Directory is installed, you should be able to access the Internet from this server, since it will forward DNS queries to other external DNS servers as necessary, starting with the Root Servers. However, for faster name resolution, you should consider setting up DNS forwarding. To do this, access the properties of you DNS server in the DNS tool, and add the IP addresses of your ISPs DNS servers to the Forwarder tab. This ensures that DNS queries for external resources will first be forwarded to your ISP, where information on many external servers is likely already cached. In general, this will result in better name resolution performance.  After Active Directory is installed, all of your internal clients should also be pointing at your new domain controller for DNS name resolution. Once they are pointing at the new domain controller for DNS purposes, add the Windows NT/2000/XP clients to your new domain. If you want to add additional domain controllers to your network, ensure that they are pointing to your new DNS server for name resolution prior to running dcpromo. If you wish, you can also make any new domain controller a DNS server by installing the DNS service on that box, and then configuring it as a secondary name server. Alternatively, you can also install DNS and then configure your company.local domain as an Active Directory integrated zone, where DNS information is actually stored as part of the Active Directory database. |

Telnet FAQ
Telnet Frequently Asked Questions

Telnet and its close cousins rlogin and tn3270 are methods of connecting to a remote computer over the Internet that let you use programs and data just as if you were using the computer locally. Do not confuse telnet with Telenet, the old name for Sprintnet.
Telnet is a text-only protocol. At one time it was one of the most common ways to connect to other sites. Now with the growth of the web, it is hardly used. There are still a few sites and resources that can only be reached through telnet.
What can I use telnet for?
- If you are a gamer, there are a number of text based games still available through telnet.
- Outside of games, unless you already know of a particular use, such as connecting to a particular government database, you probably have no use for it.
- For years, many library catalogs were only reachable through telnet. Many early community resources, called free-nets, were reachable through telnet. You would have trouble finding any of these now.
- Delphi's Internet service, the first nationwide Internet service available to the public, closed its telnet access on April 30, 2001.
How can I connect to a telnet address of my choosing?
If your Internet provider supports telnet (not all do), you can connect to a telnet address in one of two ways:
- Recent versions of Windows include a command line telnet. Begin at Start/Run and type command. On the next screen, type your telnet command. From a SLIP or PPP or ethernet connected account: type a telnet URL into the location window of your browser. To do this, your browser must be configured with a supporting version of telnet software. Two good ones, better than the built-in command line telnet for Windows, are NetTerm and CRT.
- If you are using Windows95, make sure you get a version that supports Win95's 32-bit stack. Although Win95 comes with a version of telnet.exe, it is a bare bones version with no zmodem transfers, and there are much better ones available.
- A telnet URL takes this form: telnet://some.address:port-number. Most of the time, the port number will be the default 23. If so, it can be omitted.
- From a unix shell account or other account that lets you type telnet commands, you can issue a command like this: telnet some.address port-number
What is tn3270? How can I connect to a tn3270 site?
TN3270 is a special type of telnet that is sometimes needed to connect to IBM mainframe sites. Regular telnet will often work, but if you have trouble with keypresses and commands, you may need to get a tn3270 client to add to your software.
Can I transfer files through a telnet connection using zmodem or other methods?
It depends on the version of telnet you are using. Some support zmodem, kermit, etc., and some do not. If you do have a version of telnet that supports these transfer methods, it still depends on whether you are using a SLIP or PPP or ethernet account where you run the software or you are using a shell account and using the shell account's software. SLIP, PPP, and networked accounts should have no problem, but shell accounts are not always configured to support binary transfers. Transferring binary files through a shell account requires the remote site to be operating in 8-bit mode, and many shell sites do not. In special circumstances, if you have enough knowledge of the configuration and operating system of the remote site, for example unix, you may be able to reset the mode.
How do I configure telnet software for Netscape or MSIE?
- You configure telnet in Netscape 4.0 by selecting Edit/Preferences/Applications and scroll down to "URL: Telnet Protocol". Highlight it and click on the Edit button. Browse for the new software to complete the setup. Then when you enter a Telnet URL in the Netsite window, it will call up the application and launch it.
- Netscape 3.0 is configured by selecting Options/General Preferences, selecting the Apps tab, and filling in the Telnet Applications window.
- To set MSIE for your preferred telnet application, load Windows Explorer (not MSIE), click on View/Options/FileTypes. Scroll down to URL: Telnet Protocol, highlight, click Edit and Browse for the software.
- For tn3270 configuration with either version of Netscape or MSIE, follow the same steps, but select tn3270 in place of telnet.
How Does Internet Reach To Home?
 Internet is basically a large network of networks. Thorough certain hierarchy of Internet Service Providers (ISPs) Internet reaches to end user. Large communications companies having their own dedicated inter-country or inter-continent submarine cables to form Internet backbones are termed as Tier-1 ISPs, e.g., Verizon, AT&T. Tier-1 ISPs sell Internet access to regional ISPs and regional ISPs in turn sell it to local ISPs. Local ISPs allow end-users to access Internet through various technologies like dial-up, wireless broadband, Digital Subscriber Line (DSL), Cable modem etc. For example, Reliance NetConnect and Tata Photon+ offer wireless Internet broadband, BSNL offers through DSL and dialup Internet. There could be one or more than one ISP in-between end-user and Tier-1 ISP, no strict rules. Regional ISPs often engage in ‘peering’, where multiple ISPs interconnect at Internet Exchange Point, allowing data to route between each network without charging one another, otherwise that data would have passed through upstream ISP, incurring charges from the upstream ISP. In reality, infrastructure is far more complex and covering every aspect is out of scope of this article.
If you are an Internet user in India then it is most likely your overseas Internet communication passes through Mumbai or Chennai, where exactly Submarine cables land in India to let it hook up with Internet. See the map below,

Image Courtesy: Guardian
Why Not Internet Through Satellite?
Before I got to know about Submarine cables, I had a perception that all Internet data routes through satellite but I was quite wrong. Below listed reasons are sufficient to justify the Submarine cable as a choice,
Firstly, Satellite can offer maximum download speed as 1Gbps and maximum upload speed as 10Mbps which is way lower than Submarine cable data transfer speed counted in Terabits per second. Secondly, signal latency is higher in satellite communication compared to ground-based communication. Latency is the delay between the actual moment of a signal’s broadcast and the time received at its destination. In case of satellite, as signal needs to travel around 35,780km to reach to the satellite and back to earth again, it takes around 1,000–1,400 milliseconds latency, substantially higher than ground-based communication latency of 150-200 ms. This could lead to adverse experience in online gaming, remote surgery, VoIP, video conferencing. Thirdly, Satellite communications specifically with higher frequency get severely affected by rain or snow fall.
Threats To Submarine Cables
Submarine cables can be damaged by anchors, earthquakes, undersea avalanches and even shark bites. For example, in February 2008, damage to submarine cable caused disruption to 70% of the nationwide Internet network in Egypt, while India suffered up to 60% disruption.[source] However, widespread cable burial has decreased the cable fault incidences significantly. Cables could be cut by enemy forces in wartime or even worse enemy could eavesdrop on the sensitive communications. For an instance, during the cold war, US navy wrapped a special device without piercing the cable case and recorded majority of the unencrypted important Russian communications passing through it. This continued for around 10 years until Russia learnt about the incident in 1981. In fact, this helped to end the cold war as it gave the US a window directly into the Soviet mind. [Read full story about the Operation Ivy Bells here.] I have found one very interesting video, explaining how alert regarding broken cable is received and how problem gets fixed. Click the below image to play,

Courtesy www.orange.com

Submarine cables based on Fiber optic technology. Image Courtesy: NSW

Cable installation in progress.


I hope this article would have provided a detailed information about Internet infrastructure, if so then please don’t forget to share it with your friends. 
What factors can affect the speed of my DSL connection?

LAN or Multiple-PC connections:
Connecting multiple PCs to a single DSL connection may cause slowdowns since the connection will be shared among multiple users. If you have selected a residential package, it is recommended that there should be only one PC per DSL connection.
Multiple-PC connections are often subject to hardware and software issues that cause slowdowns. Always seek professional help from a computer shop or a network technician when setting up a multiple-PC connection.
Multiple Downloads and Applications:
Running multiple downloads and applications on a single DSL connection may cause slowdowns, as they will all share the same connection. Limit the number of downloads being done simultaneously and see if this improves performance. While you’re downloading large files, avoid using other internet services that require high connection speed, such as online gaming or video-streaming.
Site/Server Congestion:
The site you are visiting may be congested because many users’ computers are connecting to it. Try visiting other websites in the meantime and return later. Site congestion is an issue that is beyond PLDT’s control and should be addressed by the website’s owner. Players of online games may also suffer lag due to the number of players connecting to the same game server. Try connecting to a less populated server and see if it improves performance.
International Connection Problems:
Connection problems in other countries can result in connection slowdowns. This is because the Internet connections of different countries are all interconnected. For example, in December 2006 a submarine cable problem in Taiwan resulted in connection problems in the entire East Asia region, including the Philippines.
Old Computer Parts/Hardware:
Low RAM (64MB or less) will result in computer slowdowns. All of your applications, Internet included, will run more slowly because of low RAM. It is recommended that DSL users should have at least 256 MB of RAM.
A low-quality LAN card can cause slowdowns. Upgrading the LAN card can improve connection speed. Low hard disk space can cause slowdowns, especially for users who download large files like videos or music. It is recommended to keep at least 500MB of hard disk space free when surfing. Computer and Modem Overheating: An overheating computer or modem can reduce its performance, which in turn can affect your connection speed. Ensure that your PC and modem are properly ventilated or air-conditioned. This will also increase their overall service life.
Virus/Spyware attacks:
Computer viruses cause slowdowns. Install and update anti-virus software to protect your PC against viruses. Install/Upgrade the latest software patches and Service Packs for your Operating System (i.e. Windows XP). Peer To Peer Program Slowdowns: When using a peer-to-peer application such as Kazaa/torrents your download speed will be dependent on the number of peers that are “seeding” the files that you are downloading. Please refer to your Peer-to-Peer program’s documentation regarding seeding for more details.
In-House Wiring:
Old or damaged in-house telephone wiring can degrade the speed of your DSL service. If you suspect your in-house wiring is damaged, contact an electrician for repairs. All extension lines must have a microfilter (included with the DSL Modem). Extension lines without microfilters are liable to cause interference and slow down connection speed.
Courtesy of PLDT.
HDD vs SSD

| ||||||||||||||||||||||||||||||||||||||||||||||||


Internet Service Provider
Current Globe, PLDT and Bayantel DSL Packages for SME and Corporate-with rates and specs(2011)
Do you need assistance basically, information about how you could choose a suitable DSL package for your business or even for home? Well, this article is for you. I just come up creating the tables below to give you some options and idea of what are the services made available or offered by our country’s leading Internet Service Provider (ISP) these are PLDT, GLobeDSL and BayanDSL.
Wireless Broadband services are not included here. However,I add some links to help you browse additional details. I patiently get the info from my friends working on the different ISP companies.
*MSF- Monthly Service Fee
Globe DSL SME and Corporate Packages June 2011
For more info about Globe DSL packages check their page.

Package Inclusions:
- Bundled with Globe landline
- Email account & storage via Globelines.com.ph
- Free WiFi / Dial-up minutes
- WiFi modems on most plans-Globe ProLink is also offered.
- Free upgrade to static IP address (upon request)
- 12 months lock-in
-------------------------------------------------------------------------------
PLDT myDSL Biz SME Packages

· The previous offers was upgraded from .5 to 1 mbps of bandwidth each plan. For example, the Small Biz lite has a 3.5 mbps of speed now it comes with 4 mbps.
· Every subscription is entitled to have the new PLDT Versatile Biz Box- a new all-in-one networking hardware could function as modem and switch which allows you to connect your local network with 2 Ethernet and USB ports. The Bix Boz is also a wireless router your office a Wi-Fi zone. This is only available to the new subscribers.
· 2 years lock-in period.
· No problem for Landline extension
Prefer for wireless internet, check the PLDT Broadband Solutions page.
BayanDSL SME Packages
BayanDSl offers two split types of PLAN for their business customers; Small Medium Enterprise and the Corporate. Primarily, the two type of PLAN differs in price, specs and as well as
BayanDSL Corporate DSL Packages
#BayanDSL Corporate DSL Packages

# BayanDSL SME Package

If you need wireless, see their Bayan Broadband page. The SME and corporate plan requires a package or installation fee of 1,999 pesos.
- One Year lock in-period and no problem with Landline extension
- The Corporate plan is ideal for BPO and other companies that requires stable and fast Internet bandwidth
- The SME package is also a best option for your business to save from monthly service fee (MSF) and a range of bandwidth choices like the corporate plan.
ATA/IDE/EIDE/SATA
ATA/IDE/EIDE/SATA
 Early PCs using the IDE interface had ISA expansion boards with an IDE connector. Most motherboards available today have multiple integrated IDE connectors. The first IDE devices were rather slow, using the 8-bit ISA interface the maximum data throughput was 4MBps, 16-bit IDE connections allowed up to 8 MBps. This first IDE/ATA standard has support for only one channel allowing a maximum of two hard disks. It supports PIO modes 0, 1, and 2, and single word DMA modes 0, 1, and 2, and multiword DMA mode 0.
PIO modes and DMA modes define different methods for the disk drive to communicate with the system. The older method Programmed I/O (PIO) requires the help of the CPU to transfer data between the disk and the system's memory. There are 5 different PIO modes listed in the following table along with their corresponding maximum transfer rates:
| PIO Mode | Transfer Rate (MBps) |
| Mode 0 |
3.3
|
| Mode 1 | 5.2 |
| Mode 2 | 8.3 |
| Mode 3 | 11.1 |
| Mode 4 | 16.7 |
DMA is short for Direct Memory Access. As it name implies, DMA allow direct access to the system's memory, bypassing the CPU. Single word DMA transfers a single word (2 bytes/16-bits) per transfer session, where multiword DMA sets up a transfer session and sends several words after each other, reducing the overhead per transfer session. The following table lists the different DMA modes along with their corresponding maximum transfer rates:
| DMA Mode | Transfer Rate (MBps) |
| Single word 0 |
2.1
|
| Single word 1 | 4.2 |
| Single word 2 | 8.3 |
| Multiword 0 | 4.2 |
| Multiword 1 | 13.3 |
| Multiword 2 | 16.7 |
In 1994 Enhanced IDE (EIDE) was developed by Western Digital to:
- increase the maximum data throughput to up to 16.7 MBps.
- increase the 528MB size limit to 8.4GB.
- support two controllers instead of one, allowing a maximum of four disks instead of two.
Seagate and Quantum developed similar technologies which were promoted as FASTATA and FASTATA-2. Eventually, the features of the these unofficial standards were combined in the official standard ATA-2. Besides the improvements listed above, ATA-2 offers support for:
- Logical Block Addressing (LBA) and block transfer
- PIO modes 3 and 4
- Multiword DMA modes 1 and 2
Several CD-ROM drive manufacturers, including Western Digital, worked together to develop a specification that would allow CD-ROM drives and tape drives to be connected to the same interface and cable as hard disk drives. The Small Form Factor (SFF) committee initially published it as the AT Attachment Packet Interface (ATAPI) specification. ATAPI eventually became an extension to ATA in ATA/ATAPI-4.
Several other additions were made to the ATA standard, such as ATA-3, which introduced some reliability features and allowed password protection for devices. The first major new version of ATA was ATA/ATAPI-4, which combined ATA with ATAPI and introduced Ultra DMA. Again there are several modes, all multiword, of Ultra DMA. The table below lists the Ultra DMA modes along with their corresponding maximum transfer rates. ATA/ATAPI 4 supports Ultra DMA mode 0, 1, and 2. Ultra DMA mode 2 is also known as Ultra DMA/33, Ultra-ATA, and ATA-33.
Several other additions were made to the ATA standard, such as ATA-3, which introduced some reliability features and allowed password protection for devices. The first major new version of ATA was ATA/ATAPI-4, which combined ATA with ATAPI and introduced Ultra DMA. Again there are several modes, all multiword, of Ultra DMA. The table below lists the Ultra DMA modes along with their corresponding maximum transfer rates. ATA/ATAPI 4 supports Ultra DMA mode 0, 1, and 2. Ultra DMA mode 2 is also known as Ultra DMA/33, Ultra-ATA, and ATA-33.
| Ultra DMA Mode | Transfer Rate (MBps) |
| Mode 0 |
16.7
|
| Mode 1 | 25 |
| Mode 2 | 33.3 |
| Mode 3 | 44.4 |
| Mode 4 | 66.7 |
| Mode 5 | 100 |
| Mode 6 | 133 |
ATA/ATAPI-5, added support for Ultra DMA mode 3 and 4. Ultra DMA mode 4 is also known as Ultra DMA/66. ATA/ATAPI-6 introduced Ultra DMA mode 5, supporting data transfer rates up to 100MBps.
Intel and a group of other companies have developed a serial version as an alternative to the parallel ATA interface and was published as Serial ATA (SATA). The SATA specification was handed over to T13 to include it in ATA/ATAPI-7 (volume 3) and is now called SATA-1. ATA/ATAPI-7 includes UltraDMA mode 6 already known as Ultra DMA 133, some new commands for use by digital video recorders, and T13's version of Serial ATA, SATA-1. SATA can transfer data up to 150MBps (and will likely advance to 300 MB and 600 MB per second in the near future), making it, in theory, faster than parallel ATA (now also referred to as PATA) using UltraDMA mode 6 running at 133MBps. These transfer rates are so called burst rates, the average rates are much lower making the difference between PATA and SATA very small. The currently available SATA hard disk are mostly not native SATA drives, instead the disks include a chip that functions as a parallel-to-serial bridge. This bridge limits the transfer rates which would be 1.5Gbps according to the first version of SATA.
The Serial ATA final 1.0a specification was released on Feb 4, 2003. Intel continues to work on SATA and joined forces with a the Serial Attached SCSI (SAS) subdivision of T10. They are currently working on an extension to the SATA 1.0a specification, called SATA II, which focuses on support for multiple devices per SATA bus, RAID, and more.
Installing an 'IDE' device
A standard PC is usually equipped with two IDE controllers ("ATA interfaces"  ), a primary and a secondary controller, also referred to as the primary and the secondary IDE channel. Per channel you can connect two devices, hence a standard PC can hold up to four IDE devices in total. The following picture shows the primary and the secondary IDE connector on the mainboard.

When two devices are connected to a single IDE channel, using the same physical cable, one device must be configured as master and the other as slave. This is usually done by setting a jumper on the device. Two other settings that typically can be set by the jumper are Cable Select (the master/slave setting will be based on the position of the device on the cable. The device farthest from the IDE controller will be selected as master) and Single (this setting can be used when there is only one device connected to the cable.)
When two devices are connected to a single IDE channel, using the same physical cable, one device must be configured as master and the other as slave. This is usually done by setting a jumper on the device. Two other settings that typically can be set by the jumper are Cable Select (the master/slave setting will be based on the position of the device on the cable. The device farthest from the IDE controller will be selected as master) and Single (this setting can be used when there is only one device connected to the cable.)
The picture below on the left, shows a regular flat ribbon 40-pins/wires IDE cable with 3 connectors, also referred to as an IDE-33 cable. The devices connect to the two connector closest together, the connector on the far end connects to the mainboard's IDE connector. One side of the cable has a red edge to mark the side that connects to pin 1 on the mainboard's connector and pin 1 on the device.
 |  |
The picture on the right shows a flat ribbon IDE-66/100 cable with 80 wires. The extra 40 strands in an 80-wire cable act as insulators between the 40 signaling strands to prevent crosstalk. This type of cable usually has one blue connector, this connector connects to one of the mainboard's IDE connectors. The black connector connect to the master device and the gray/white connector to the slave. This type of cable was optional for ATA/ATAPI-4 compliant devices and is mandatory in ATA/ATAPI-5 to be able to support the maximum transfer rates. If you have an ATA/66, 100 or 133 drive without the 80-wire cable, the drive will only run at 33MB/sec. An alternative to the flat ribbon cable has been introduced a couple of years ago. The main advantage is better airflow inside the computer's case, hence a 'cooler' system.
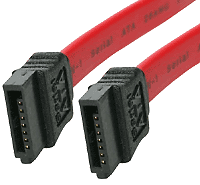
SATA supports a single device per SATA cable. A SATA cable can be longer than a parallel ATA cable (max. 1.5 feet), about 3 feet. Serial ATA has a thinner cable and a smaller connection that is keyed so they cannot be connected incorrectly, unlike some parallel ATA cables. The following pictures show the new Serial ATA 7-wires cable and its connectors.
SATA supports a single device per SATA cable. A SATA cable can be longer than a parallel ATA cable (max. 1.5 feet), about 3 feet. Serial ATA has a thinner cable and a smaller connection that is keyed so they cannot be connected incorrectly, unlike some parallel ATA cables. The following pictures show the new Serial ATA 7-wires cable and its connectors.
 |  |
RAID
RAID stand for Redundant Array of Inexpensive (or Independent) Disks, and is commonly used on servers in corporate environments. It allows multiple hard disks to be combined. The three most common, and important for the Network+ exam, are described next.
RAID 1 refers to Disk Mirroring/Duplexing. This configuration requires two, in some cases identical, hard disks. When the OS writes data to the hard disk, the same data is also written to the mirrored disk. This may slow down write performance, but increases read performance since data can be read form both disks at the same time. It's called duplexing when each disk has its own hard disk controller, providing an extra level of redundancy. When a disk fails the other disk can continue to operate, in some configurations this process occurs entirely automatically. In Window NT and higher, when the main disk fails, you'll need to manually configure the system to use the mirrored disk.
RAID 5 is more advanced and requires at least 3 hard disks. RAID 5 is also known as a stripe set with parity. When data is written to the RAID 5 set, it is distributed over several disks, and parity information about data blocks on one disk are stored on the other disks. In case of a disk failure, the parity information can be used to reconstruct the data which was on the missing disk. Because data is spread out over several disks, RAID 5 offers better read performance than single or mirrored disks. But because every write requires the parity calculation, write performance can be slower, especially when RAID 5 is implemented in software. If two disks in a RAID 5 set fail, you will need to replace the disks and restore the information from backup.
Fault tolerance RAID configurations implemented in hardware usually offer hot-swapable drives. This means you can pull out and replace a drive while the system is running, and it will perform the reconstruction of the data automatically.
Another type is RAID 0, also known as a stripe set. It requires at least 2 hard disks, but does not offer fault tolerance, it's merely a method of combining hard disks to allow for larger volumes. When a file is written to a RAID 0 stripe set with 2 disks, the first block is written to the first disk, the second block to the second disk, and the third data block is written on the first disk, and so on. If one of the hard disks in the stripe set fails, the entire stripe set is lost and needs to be rebuild and restored from backup.
WiMax Technology
What is WiMAX?
WiMAX combines the familiarity of Wi-Fi with the mobility of cellular that will deliver personal mobile broadband that moves with you. It will let you get connected to the Internet, miles from the nearest Wi-Fi hotspot. Mobile WiMAX will blanket large areas - metropolitan, suburban, or rural, delivering mobile broadband Internet access at speeds similar to, and frequently faster, than existing broadband, utilising NLOS (non-line-of-sight) technology.

WiMAX is built for the future with advanced, efficient wireless technology that provides higher speeds than today’s wide area wireless technologies such as Wi-Fi and 3G mobile broadband. It will be able to completely transform your mobile Internet lifestyle, enabling you to connect in ways you’ve only dreamed about.
3G mobile broadband and WiMAX latency compared: the time lag caused by a wireless WiMAX link is signficantly lower than 3G: a round-trip ping of 30-40 milliseconds, compared with 300-400 milliseconds on the slower 3G mobile broadband.
WiMAX is a Wide Area Network (WAN) technology. Service providers, such as Save9, can deploy a network of towers that will enable access over many miles. Internet access is instantly available anywhere within coverage areas. And like Wi-Fi, WiMAX is a standards-based technology that will unleash the benefits of open markets and global economies of scale to deliver the devices and services that consumers want.

Wireless for all Reasons
The WiMAX standard supports mobile, portable and fixed service options. This enables Save9 to offer broadband Internet access to areas underserved by telephone and cable companies. For fixed WiMAX deployments, Save9 supplies Customer Premises Equipment (CPE) that acts as a wireless “modem” to provide the interface to the WiMAX network for a specific location, such as a office, cafe or home. WiMAX is also well suited for emerging markets and rural areas as a cost-effective way to deliver high-speed Internet.
WiMAX is built for the internet
WiMAX is built from the ground up for internet applications, services and security - with architecture specifically designed to seamlessly extend the internet to mobile users. Because WiMAX is built on Internet protocol (IP) networking, it supports all the latest IP security and quality of service (QoS) standards. WiMAX support of QoS standards enables real-time media like Voice over IP (VoIP) and streaming video.


WiMAX and Wi-Fi Synergies
WiMAX takes your wireless internet further, but you don’t have to burn any Wi-Fi bridges. WiMAX and Wi-Fi are perfectly compatible companions. Together, they give you an always-best connected experience whether you are in a Wi-Fi or WiMAX coverage area.
The Wi-Fi access points shown in the image on the left are also WiMAX units that wirelessly connect at high-speed to a WiMAX base station mast. This wireless backhaul service, usually terminating at a Fibre broadband internet connection in a building, ensures scalable Wi-Fi deployment in towns, cities and rural areas.
Why WiMAX?
WiMAX success stems from a robust vision incorporating four key strengths:
Open standards-based, interoperable technology built from the ground up for the Internet fosters innovation and competition.
Vibrant, growing ecosystem of industry leaders such as Intel, Motorola, Samsung, Nokia, Cisco, and hundreds of other companies.
Global economies of scale and more attractive intellectual property environment that enable lower costs compared to other wireless technologies.
Advanced wireless technology that enables a faster wireless broadband solution for doing more on the go.
Subscribe to:
Posts (Atom)